Jenkins and LocalVC Setup
This section describes how to set up a programming exercise environment based on Jenkins and LocalVC, which is integrated in Artemis.
Optional commands are in curly brackets {}.
The following assumes that all instances run on separate servers. If you have one single server, or your own NGINX instance, just skip all NGINX related steps and use the configurations provided under Separate NGINX Configurations.
If you want to setup everything on your local development computer, ignore all NGINX related steps.
Just make sure that you use unique port mappings for your Docker containers (e.g. 8081 for Jenkins, 8080 for Artemis).
Prerequisites
Make sure that docker has enough memory (~ 6GB). To adapt it, go to Preferences -> Resources and restart Docker.
Artemis Configuration
In order to use Artemis with Jenkins as Continuous Integration Server and LocalVC as integrated Version Control Server, you have to configure the file application-prod.yml (Production Server) or application-artemis.yml (Local Development) accordingly.
Please note that all values in <..> have to be configured properly. These values will be explained below in the corresponding sections.
If you want to set up a local environment, copy the values below into your application-artemis.yml or application-local.yml file (the latter is recommended).
artemis:
  course-archives-path: ./exports/courses
  repo-clone-path: ./repos
  repo-download-clone-path: ./repos-download
  bcrypt-salt-rounds: 11  # The number of salt rounds for the bcrypt password hashing. Lower numbers make it faster but more unsecure and vice versa.
                          # Please use the bcrypt benchmark tool to determine the best number of rounds for your system. https://github.com/ls1intum/bcrypt-Benchmark
  user-management:
      use-external: false
      internal-admin:
          username: artemis_admin
          password: artemis_admin
      accept-terms: false
      login:
          account-name: TUM
  version-control:
      url: http://localhost:8080
      user: root
      password: dummy # has to be set, but does not matter for LocalVC
      build-agent-git-username: jenkins
      build-agent-git-password: artemis_admin # choose some strong password and username (gives read access to all repositories)
  continuous-integration:
      user: artemis_admin
      password: artemis_admin
      url: http://localhost:8082
      vcs-credentials: artemis_localvc_credentials
      artemis-authentication-token-key: artemis_notification_plugin_token
      artemis-authentication-token-value: artemis_admin
      build-timeout: 30
  git:
      name: Artemis
      email: artemis@xcit.tum.de
jenkins:
    # only required if Artemis and Jenkins cannot communicate on their public URLs
    # e.g., Jenkins is only available in a local container network
    internal-urls:
        ci-url: http://jenkins:8080
        vcs-url: http://172.17.0.1:8080 # `http://host.docker.internal:8080` for Windows
    use-crumb: false
server:
    port: 8080
    url: http://172.17.0.1:8080 # `http://host.docker.internal:8080` for Windows
In addition, you have to start Artemis with the profiles localvc and jenkins so that the correct adapters will be used, e.g.:
--spring.profiles.active=dev,jenkins,localvc,artemis,scheduling
Please read the Server Setup guide for more details.
For a local setup on Windows you can use http://host.docker.internal appended by the chosen ports as the continuous-integration url and the internal vcs url.
Make sure to change the server.url and artemis.version-control.url value in application-dev.yml or application-prod.yml accordingly.
The server.url value will be used for the communication hooks from Jenkins to Artemis.
In case you use a different port than 80 (http) or 443 (https) for the communication, you have to append it to the both urls value, e.g. 127.0.0.1:8080.
When you start Artemis for the first time, it will automatically create an admin user.
Manual Admin User Creation (if automatic creation fails)
Sometimes Artemis does not generate the admin user which may lead to a startup error. You will have to create the user manually in the MySQL database. Make sure both are set up correctly and follow these steps:
-
Use the tool mentioned above to generate a password hash.
-
Connect to the database via a client like MySQL Workbench and execute the following query to create the user. Replace
artemis_adminandHASHED_PASSWORDwith your chosen username and password:INSERT INTO `artemis`.`jhi_user` (`id`,`login`,`password_hash`,`first_name`,`last_name`,`email`,
`activated`,`lang_key`,`activation_key`,`reset_key`,`created_by`,`created_date`,`reset_date`,
`last_modified_by`,`last_modified_date`,`image_url`,`last_notification_read`,`registration_number`)
VALUES (1,"artemis_admin","HASHED_PASSWORD","artemis","administrator","artemis_admin@localhost",
1,NULL,NULL,NULL,NULL,NULL,NULL,NULL,NULL,NULL,NULL,NULL); -
Give the user admin and user roles:
INSERT INTO `artemis`.`jhi_user_authority` (`user_id`, `authority_name`) VALUES (1,"ROLE_ADMIN");
INSERT INTO `artemis`.`jhi_user_authority` (`user_id`, `authority_name`) VALUES (1,"ROLE_USER");
Starting the Artemis server should now succeed.
Jenkins Setup
Automated Jenkins Server Setup
The following steps describe how to deploy a pre-configured version of the Jenkins server. This is ideal as a quickstart for developers. For a more detailed setup, see Manual Jenkins Server Setup.
In a production setup, you have to at least change the user credentials (in the file jenkins-casc-config-localvc.yml).
-
You can now first build and deploy Jenkins, then you can also start the other services which weren't started yet:
JAVA_OPTS=-Djenkins.install.runSetupWizard=false docker compose -f docker/<Jenkins setup to be launched>.yml up --build -d jenkins
docker compose -f docker/<Jenkins setup to be launched>.yml up -d
Jenkins is then reachable under http://localhost:8082/, and you can log in using the credentials specified in
jenkins-casc-config-localvc.yml(defaults toartemis_adminas both username and password). -
The
application-local.ymlmust be adapted with the values configured injenkins-casc-config-localvc.yml:artemis:
user-management:
use-external: false
internal-admin:
username: artemis_admin
password: artemis_admin
version-control:
url: http://localhost:8080
user: root
password: dummy # have to be set, but does not matter for LocalVC
build-agent-git-username: jenkins
build-agent-git-password: artemis_admin # choose some strong password and username (gives read access to all repositories)
continuous-integration:
user: artemis_admin
password: artemis_admin
url: http://localhost:8082
vcs-credentials: artemis_localvc_credentials
artemis-authentication-token-key: artemis_notification_plugin_token
artemis-authentication-token-value: artemis_admin -
Open the
src/main/resources/config/application-jenkins.ymland change the following: Again, if you are using a development setup, the template in the beginning of this page already contains the correct values.jenkins:
internal-urls:
ci-url: http://jenkins:8080
vcs-url: http://172.17.0.1:8080 # `http://host.docker.internal:8080` for Windows -
You're done. You can now run Artemis with the LocalVC/Jenkins environment.
Manual Jenkins Server Setup
-
Pull the latest Jenkins LTS Docker image
Run the following command to get the latest jenkins LTS docker image.
docker pull jenkins/jenkins:lts
Nginx Proxy Setup
If you run your own NGINX or if you install Jenkins on a local development computer, you can skip this section and continue to start Jenkins.
-
Create a file increasing the maximum file size for the Nginx proxy. The nginx-proxy uses a default file limit that is too small for the plugin that will be uploaded later. Skip this step if you have your own NGINX instance.
echo "client_max_body_size 16m;" > client_max_body_size.conf -
The NGINX default timeout is pretty low. For plagiarism check and unlocking student repos for the exam a higher timeout is advisable. Therefore we write our own nginx.conf and load it in the container.
user  nginx;
worker_processes  auto;

error_log  /var/log/nginx/error.log warn;
pid        /var/run/nginx.pid;


events {
    worker_connections  1024;
}


http {
    include       /etc/nginx/mime.types;
    default_type  application/octet-stream;

    log_format  main  '$remote_addr - $remote_user [$time_local] "$request" '
                      '$status $body_bytes_sent "$http_referer" '
                      '"$http_user_agent" "$http_x_forwarded_for"';

    access_log  /var/log/nginx/access.log  main;

    fastcgi_read_timeout 300;
    proxy_read_timeout 300;

    sendfile        on;
    #tcp_nopush     on;

    keepalive_timeout  65;

    #gzip  on;

    include /etc/nginx/conf.d/*.conf;
}
daemon off -
Run the NGINX proxy docker container, this will automatically setup all reverse proxies and force https on all connections. (This image would also setup proxies for all other running containers that have the VIRTUAL_HOST and VIRTUAL_PORT environment variables). Skip this step if you have your own NGINX instance.
docker run -itd --name nginx_proxy \
    -p 80:80 -p 443:443 \
    --restart always \
    -v /var/run/docker.sock:/tmp/docker.sock:ro \
    -v /etc/nginx/certs \
    -v /etc/nginx/vhost.d \
    -v /usr/share/nginx/html \
    -v $(pwd)/client_max_body_size.conf:/etc/nginx/conf.d/client_max_body_size.conf:ro \
    -v $(pwd)/nginx.conf:/etc/nginx/nginx.conf:ro \
jwilder/nginx-proxy -
The nginx proxy needs another docker-container to generate letsencrypt certificates. Run the following command to start it (make sure to change the email-address). Skip this step if you have your own NGINX instance.
docker run --detach \
    --name nginx_proxy-letsencrypt \
    --volumes-from nginx_proxy \
    --volume /var/run/docker.sock:/var/run/docker.sock:ro \
    --env "DEFAULT_EMAIL=mail@yourdomain.tld" \
    jrcs/letsencrypt-nginx-proxy-companion
Start Jenkins
-
Run Jenkins by executing the following command (change the hostname and choose which port alternative you need)
docker run -itd --name jenkins \
    --restart always \
    -v jenkins_data:/var/jenkins_home \
    -v /var/run/docker.sock:/var/run/docker.sock \
    -v /usr/bin/docker:/usr/bin/docker:ro \
    -e VIRTUAL_HOST=your.jenkins.domain -e VIRTUAL_PORT=8080 \    # Alternative 1: If you are NOT using a separate NGINX instance
    -e LETSENCRYPT_HOST=your.jenkins.domain \                     # Only needed if Alternative 1 is used
    -p 8082:8080 \                                                # Alternative 2: If you ARE using a separate NGINX instance OR you ARE installing Jenkins on a local development computer
    -u root \
jenkins/jenkins:ltsℹ️Note that you can omit the
-u root,-v /var/run/docker.sock:/var/run/docker.sockand-v /usr/bin/docker:/usr/bin/docker:roparameters, if you do not want to run Docker builds on the Jenkins controller (but e.g. use remote agents). -
Open Jenkins in your browser (e.g. http://localhost:8082) and setup the admin user account (install all suggested plugins). You can get the initial admin password using the following command.
# Jenkins highlights the password in the logs, you can't miss it
docker logs -f jenkins
# or alternatively
docker exec jenkins cat /var/jenkins_home/secrets/initialAdminPassword -
Set the chosen credentials in the Artemis configuration
application-artemis.ymlartemis:
continuous-integration:
user: your.chosen.username
password: your.chosen.password
Required Jenkins Plugins
The custom Jenkins Dockerfile takes advantage of the Plugin Installation Manager Tool for Jenkins to automatically install the plugins listed below. If you used the Dockerfile, you can skip these steps and Server Notification Plugin. The list of plugins is maintained in docker/jenkins/plugins.yml.
You will need to install the following plugins (apart from the recommended ones that got installed during the setup process):
-
Timestamper for adding the time to every line of the build output (Timestamper might already be installed)
-
Pipeline for defining the build description using declarative files (Pipeline might already be installed)
ℹ️This is a suite of plugins that will install multiple plugins
-
Pipeline Maven to use maven within the pipelines. If you want to use Docker for your build agents you may also need to install Docker Pipeline.
-
Matrix Authorization Strategy Plugin for configuring permissions for users on a project and build plan level (Matrix Authorization Strategy might already be installed).
Plugins for Legacy Exercises (Pre-4.7.3)
The plugins above (and the pipeline-setup associated with it) got introduced in Artemis 4.7.3. If you are using exercises that were created before 4.7.3, you also have to install these plugins:
Please note that this setup is deprecated and will be removed in the future. Please migrate to the new pipeline-setup if possible.
-
Multiple SCMs for combining the exercise test and assignment repositories in one build
-
Post Build Task for preparing build results to be exported to Artemis
-
Xvfb for exercises based on GUI libraries, for which tests have to have some virtual display
Choose "Download now and install after restart" and checking the "Restart Jenkins when installation is complete and no jobs are running" box
Timestamper Configuration
Go to Manage Jenkins → System Configuration → Configure. There you will find the Timestamper configuration, use the following value for both formats:
'<b>'yyyy-MM-dd'T'HH:mm:ssX'</b> '

Server Notification Plugin
Artemis needs to receive a notification after every build, which contains the test results and additional commit information. For that purpose, we developed a Jenkins plugin, that can aggregate and POST JUnit formatted results to any URL.
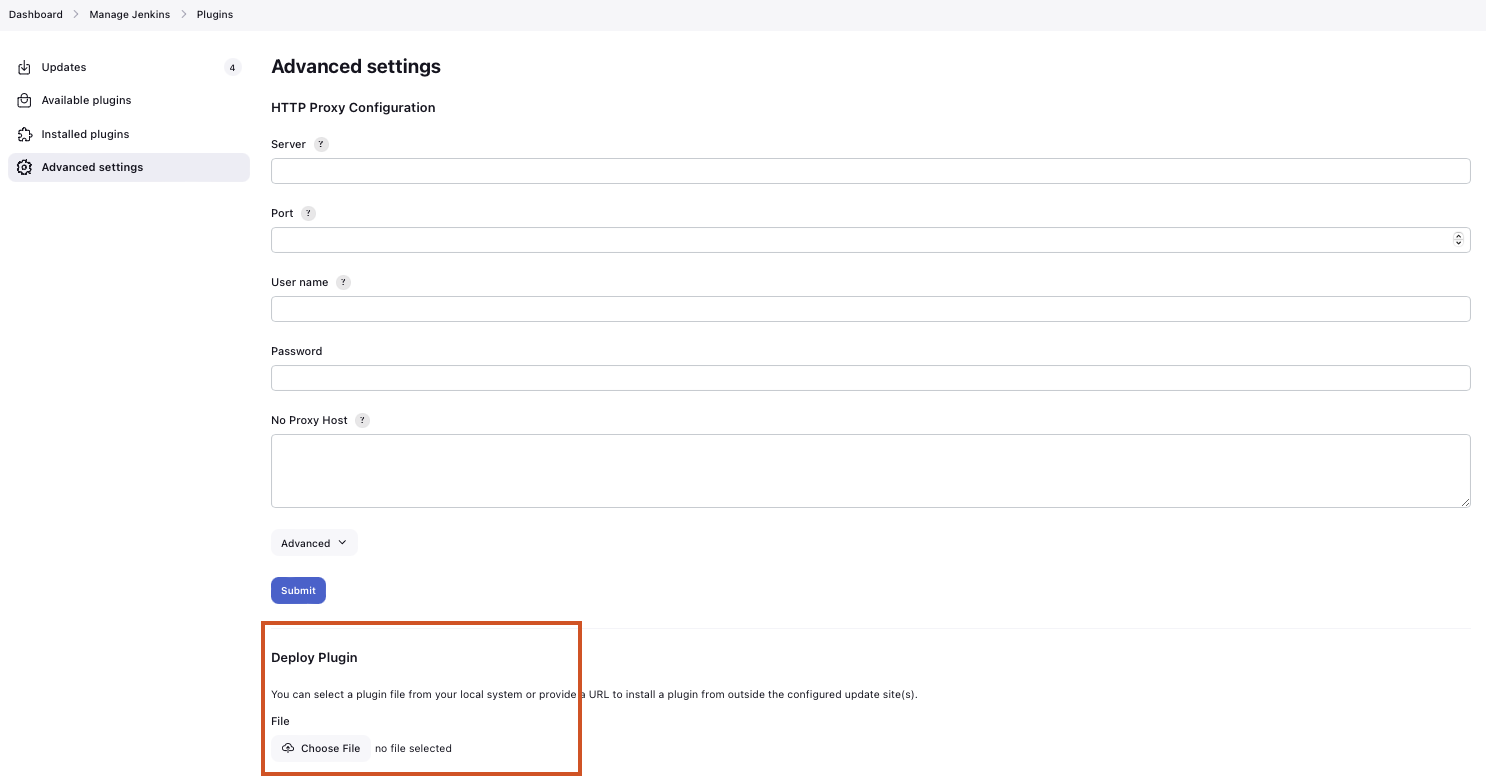
You can download the current release of the plugin here (Download the .hpi file). Go to the Jenkins plugin page (Manage Jenkins → System Configuration → Plugins) and install the downloaded file under the Advanced settings tab under Deploy Plugin
Jenkins Credentials
Go to Manage Jenkins → Security → Credentials → Jenkins → Global credentials and create the following credentials:
Server Notification Token
-
Create a new Jenkins credential containing the token, which gets sent by the server notification plugin to Artemis with every build result:
- Kind: Secret text
- Scope: Global
- Secret: your.secret_token_value (choose any value you want, copy it for the next step)
- Leave the ID field blank
- The description is up to you
-
Copy the generated ID of the new credentials and put it into the Artemis configuration
application-artemis.ymlartemis:
continuous-integration:
artemis-authentication-token-key: the.id.of.the.notification.token.credential -
Copy the actual value you chose for the token and put it into the Artemis configuration
application-artemis.ymlartemis:
continuous-integration:
artemis-authentication-token-value: the.actual.value.of.the.notification.token
LocalVC Repository Access
-
Create a new Jenkins credentials containing the username and password of the build-agent-git-user:
- Kind: Username with password
- Scope: Global
- Username: the_username_you_chose_at_build-agent-git-username
- Password: the_password_you_chose_at_build-agent-git-password
- Leave the ID field blank
- The description is up to you
-
Copy the generated ID (e.g.
ea0e3c08-4110-4g2f-9c83-fb2cdf6345fa) of the new credentials and put it into the Artemis configuration fileapplication-artemis.ymlartemis:
continuous-integration:
vcs-credentials: the.id.of.the.username.and.password.credentials.from.jenkins
Upgrading Jenkins
In order to upgrade Jenkins to a newer version, you need to rebuild the Docker image targeting the new version. The stable LTS versions can be viewed through the changelog and the corresponding Docker image can be found on dockerhub.
-
Open the Jenkins Dockerfile and replace the value of
FROMwithjenkins/jenkins:lts. After running the commanddocker pull jenkins/jenkins:lts, this will use the latest LTS version in the following steps. You can also use a specific LTS version. For example, if you want to upgrade Jenkins to version2.289.2, you will need to use thejenkins/jenkins:2.289.2-ltsimage. -
If you're using
docker compose, you can simply use the following command and skip the next steps.docker compose -f docker/<Jenkins setup to be launched>.yml up --build -d -
Build the new Docker image:
docker build --no-cache -t jenkins-artemis .The name of the image is called
jenkins-artemis. -
Stop the current Jenkins container (change jenkins to the name of your container):
docker stop jenkins -
Rename the container to
jenkins_oldso that it can be used as a backup:docker rename jenkins jenkins_old -
Run the new Jenkins instance:
docker run -itd --name jenkins --restart always \
 -v jenkins_data:/var/jenkins_home \
 -v /var/run/docker.sock:/var/run/docker.sock \
-p 9080:8080 jenkins-artemis \ -
You can remove the backup container if it's no longer needed:
docker rm jenkins_old
You should also update the Jenkins plugins regularly due to security reasons. You can update them directly in the Web User Interface in the Plugin Manager.
Build Agents
You can either run the builds locally (that means on the machine that hosts Jenkins) or on remote build agents.
Configuring Local Build Agents
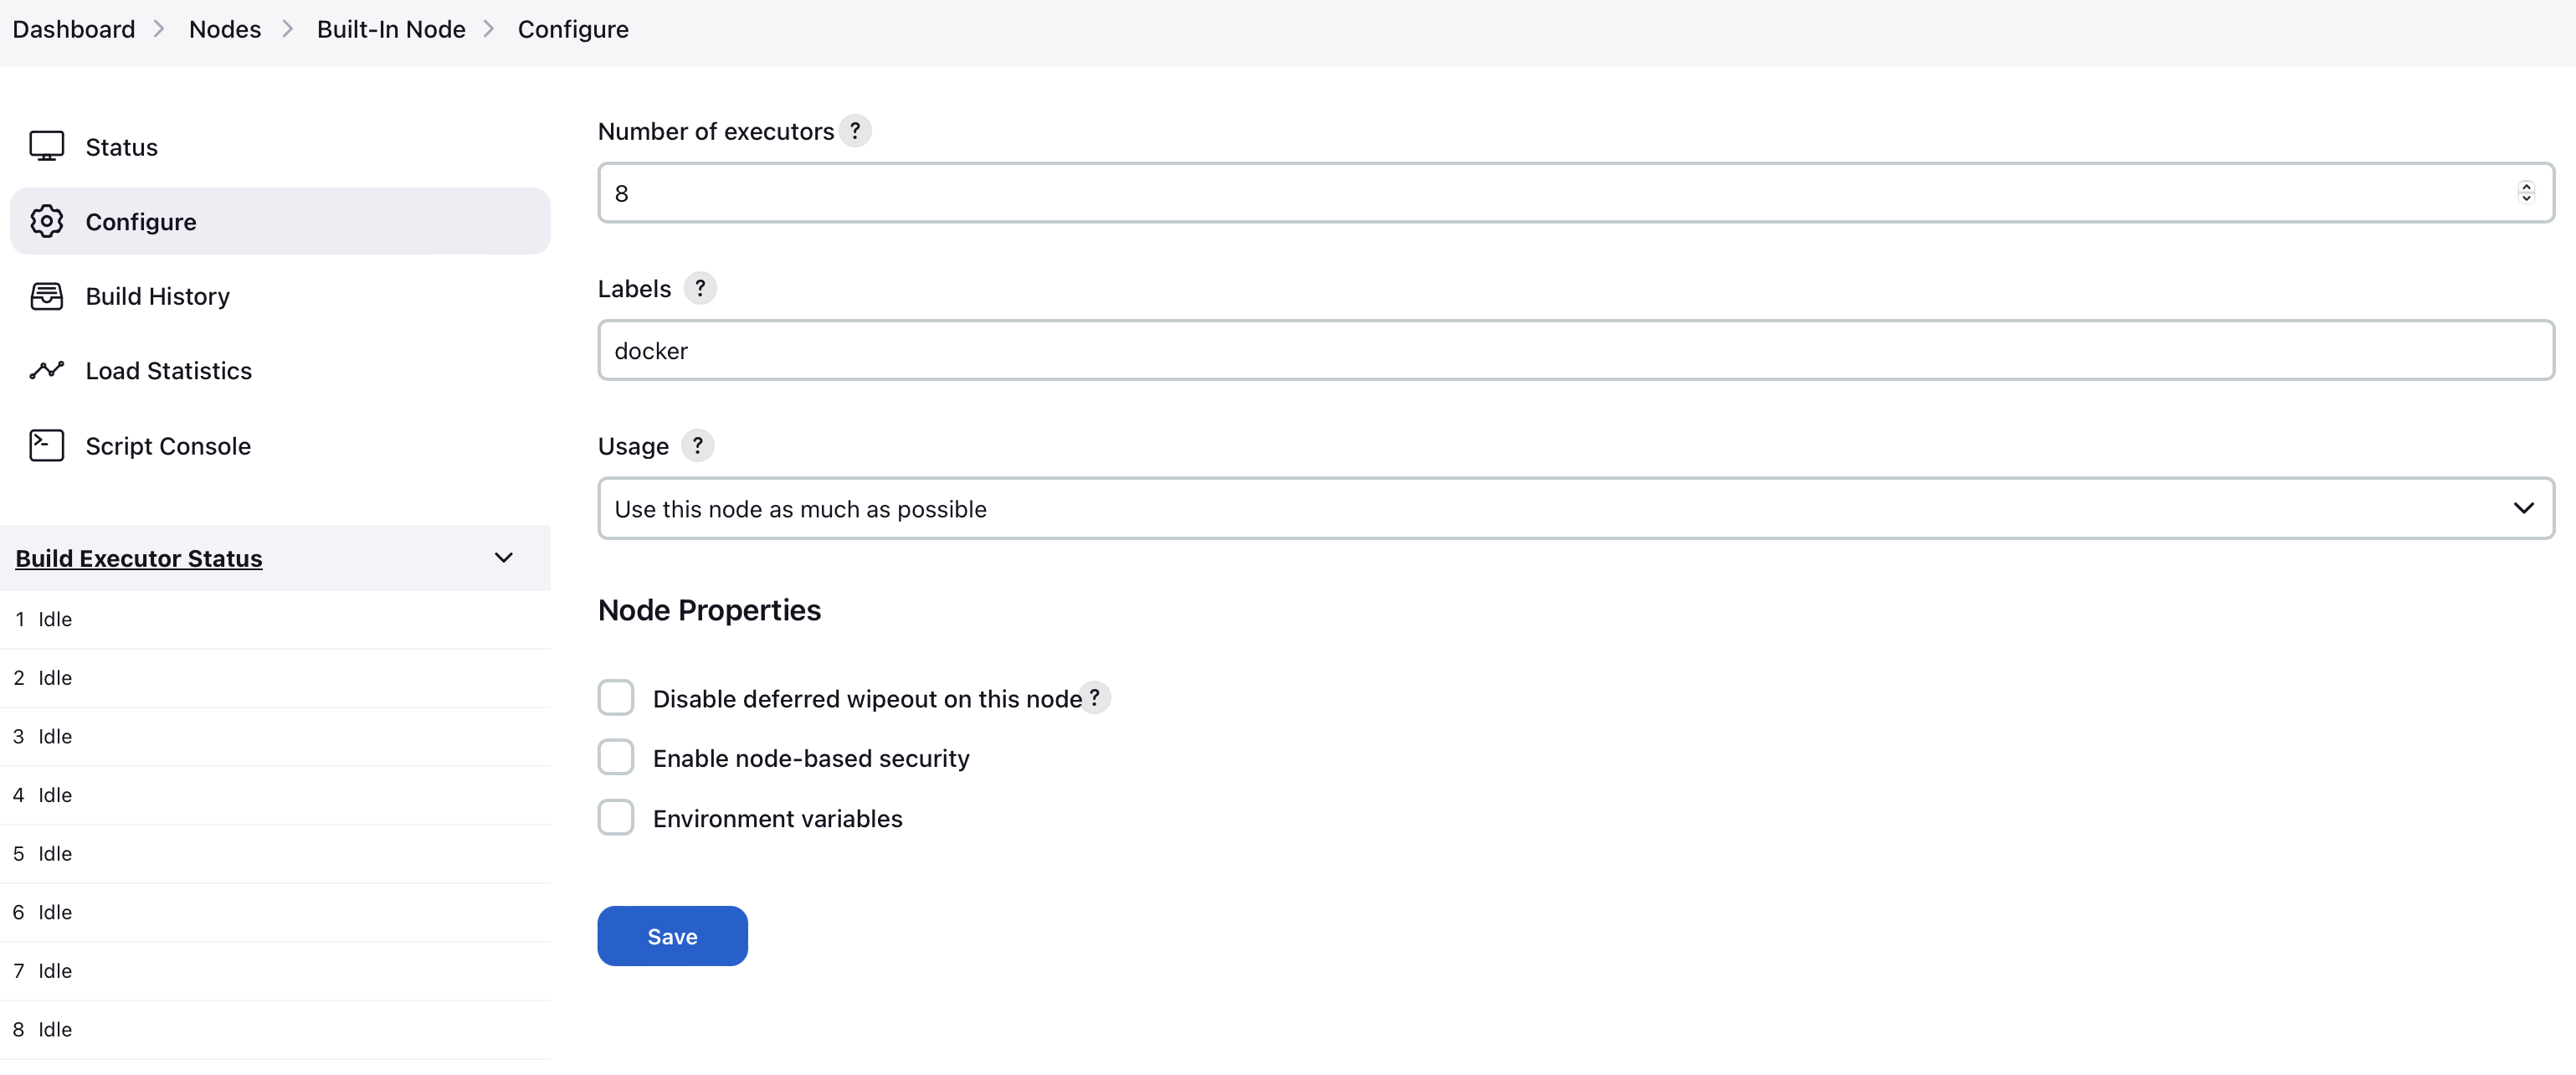
Go to Manage Jenkins → Nodes → Built-In Node → Configure
Configure your master node like this (adjust the number of executors, if needed). Make sure to add the docker label.
Alternative Local Build Agents Setup Using Docker
An alternative way of adding a build agent that will use docker (similar to the remote agents below) but running locally, can be done using the jenkins/ssh-agent docker image.
Prerequisites:
- Make sure to have Docker installed
Agent setup:
-
Create a new SSH key using
ssh-keygen(if a passphrase is added, store it for later) -
Copy the public key content (e.g. in ~/.ssh/id_rsa.pub)
-
Run:
docker run -d --name jenkins_agent -v /var/run/docker.sock:/var/run/docker.sock \
jenkins/ssh-agent:latest "<copied_public_key>" -
Get the GID of the 'docker' group with
cat /etc/groupsand remember it for later -
Enter the agent's container with
docker exec -it jenkins_agent bash -
Install Docker with
apt update && apt install docker.io -
Check if group 'docker' already exists with
cat /etc/groups. If yes, remove it withgroupdel docker -
Add a new 'docker' group with the same GID as seen in point 2 with
groupadd -g <GID> docker -
Add 'jenkins' user to the group with
usermod -aG docker jenkins -
Activate changes with
newgrp docker -
Now check if 'jenkins' has the needed permissions to run docker commands
- Log in as 'jenkins' with
su jenkins - Try if
docker inspect <agent_container_name>works or if a permission error occurs - If a permission error occurs, try to restart the docker container
- Log in as 'jenkins' with
-
Now you can exit the container executing
exittwice (the first will exit the jenkins user and the second the container)
Add agent in Jenkins:
-
Open Jenkins in your browser (e.g. localhost:8082)
-
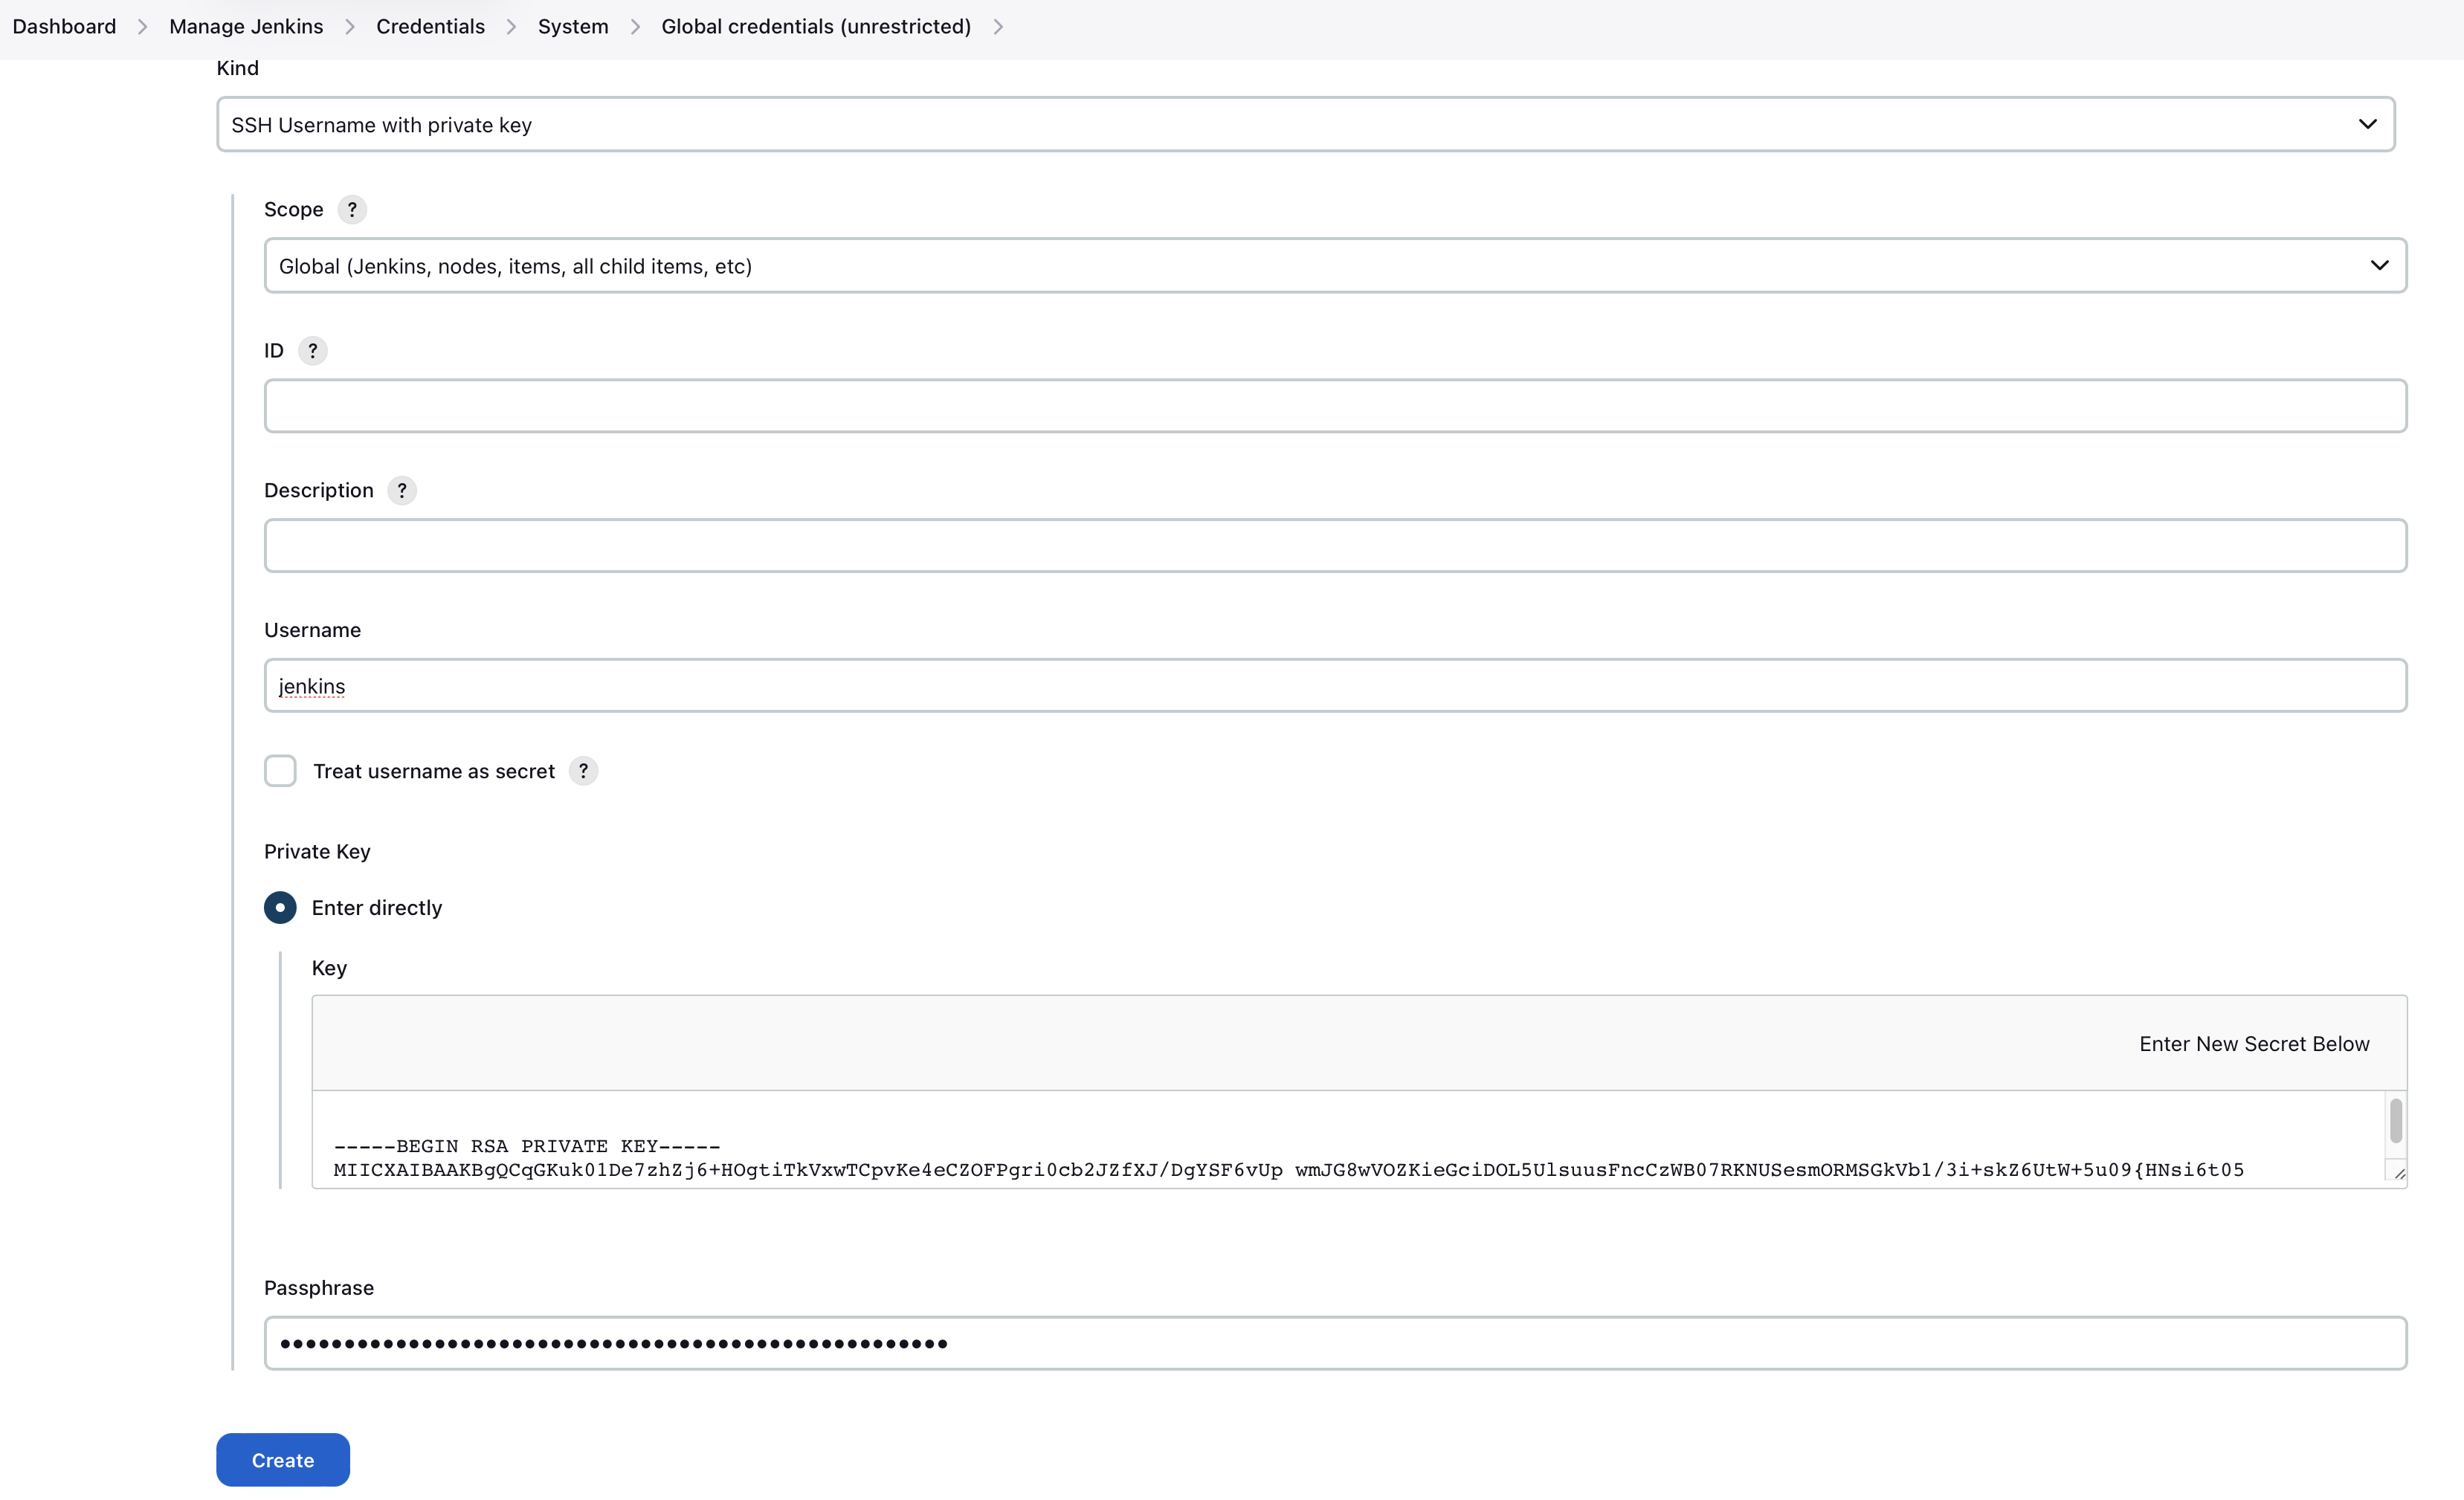
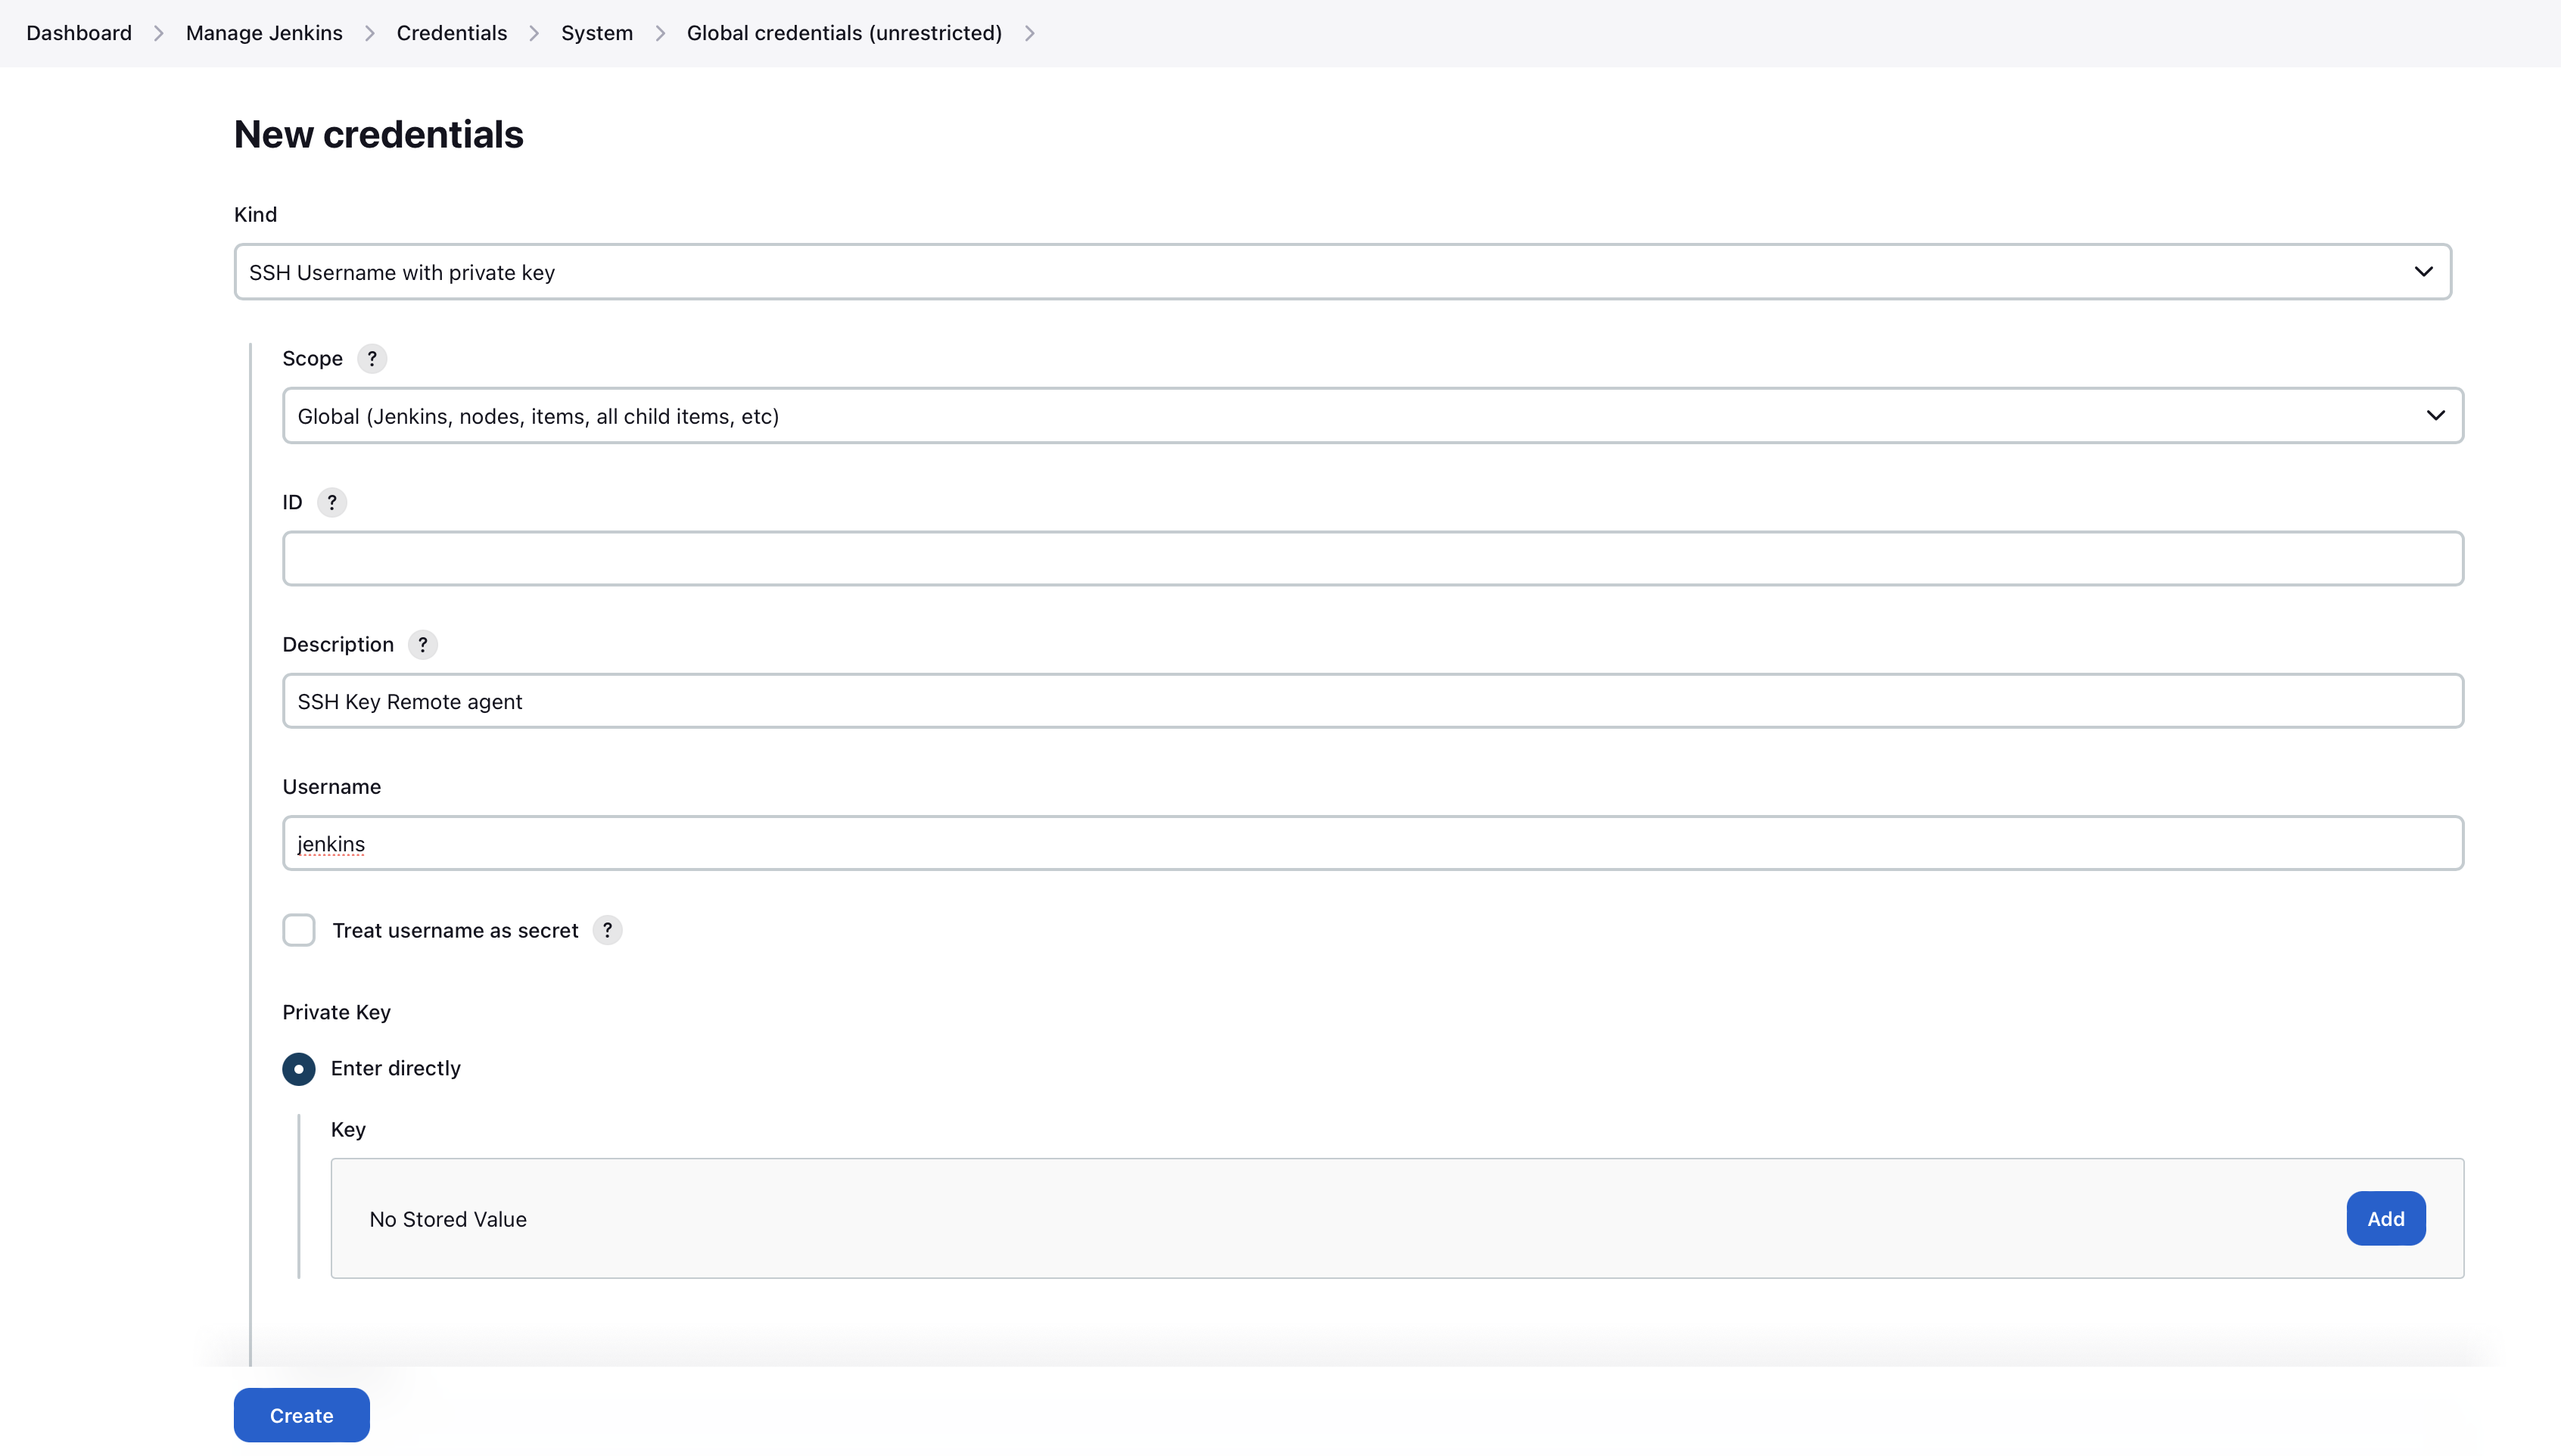
Go to Manage Jenkins → Credentials → System → Global credentials (unrestricted) → Add Credentials
- Kind: SSH Username with private key
- Scope: Global (Jenkins, nodes, items, all child items, etc)
- ID: leave blank
- Description: Up to you
- Username: jenkins
- Private Key:
<content of the previously generated private key>(e.g /root/.ssh/id_rsa) - Passphrase:
<the previously entered passphrase>(you can leave it blank if none has been specified)
-
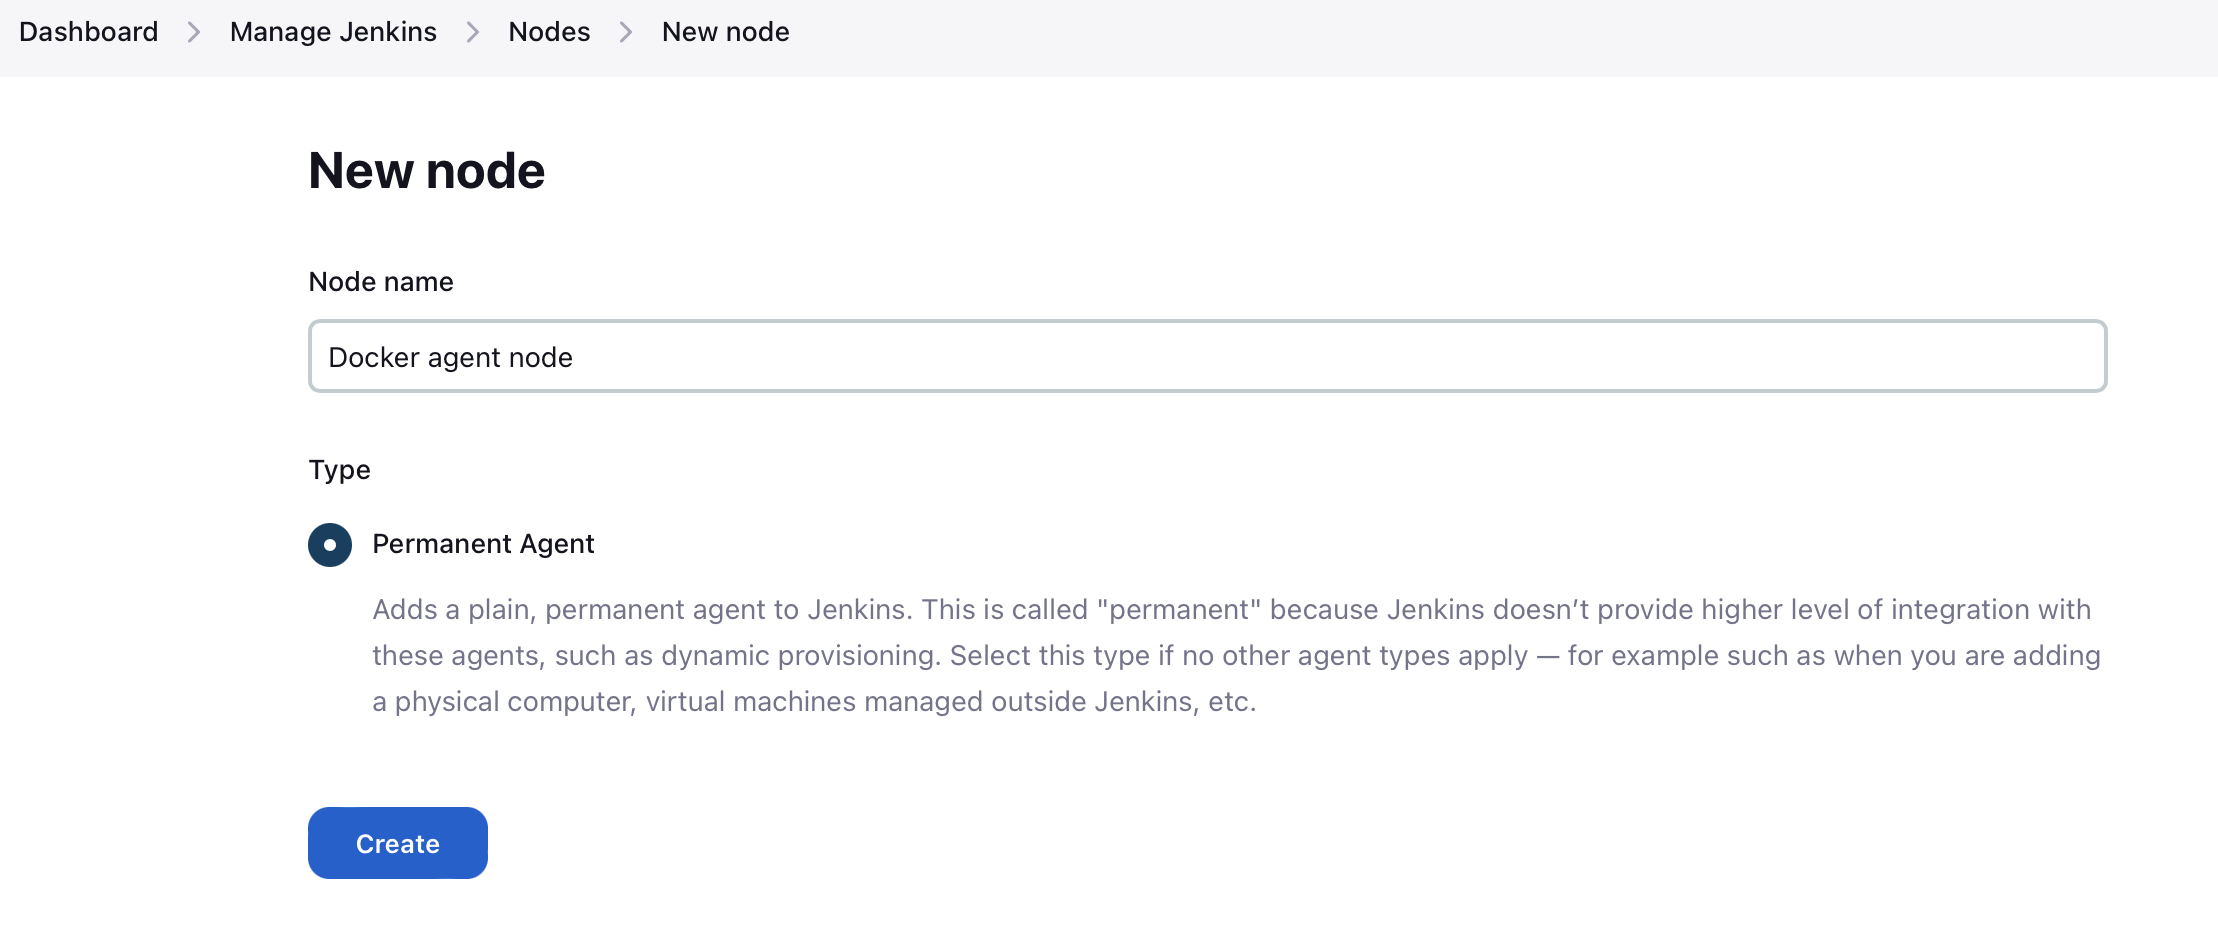
Go to Manage Jenkins → Nodes → New Node
- Node name: Up to you (e.g. Docker agent node)
- Check 'Permanent Agent'
-
Node settings:
- # of executors: Up to you (e.g. 4)
- Remote root directory: /home/jenkins/agent
- Labels: docker
- Usage: Only build jobs with label expressions matching this node
- Launch method: Launch agents via SSH
- Host: output of command
docker inspect --format '{{ .Config.Hostname }}' jenkins_agent - Credentials:
<the previously created SSH credential> - Host Key Verification Strategy: Non verifying Verification Strategy
- Availability: Keep this agent online as much as possible
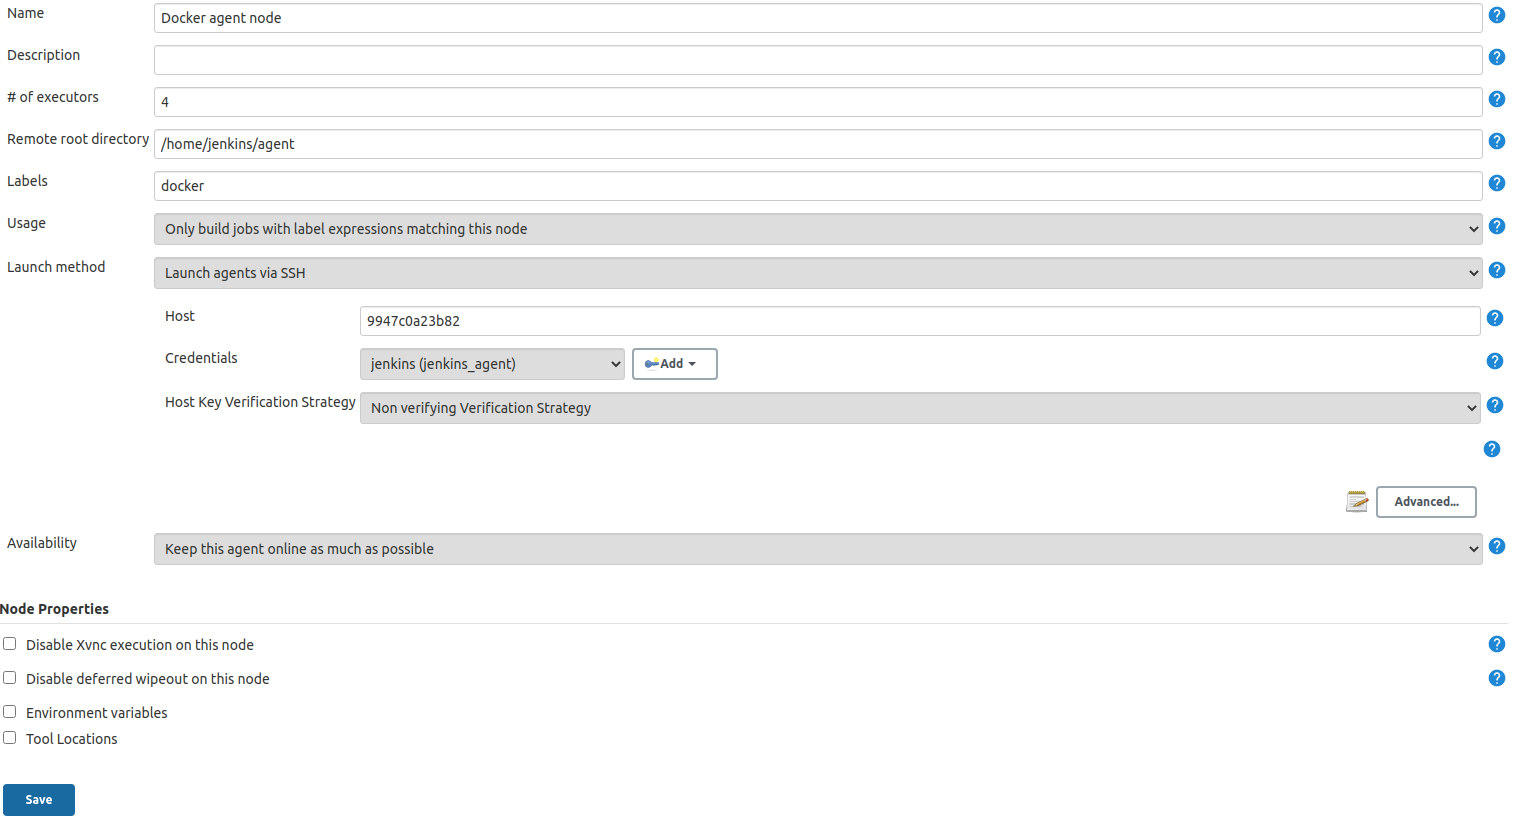
-
Save the new node
-
Node should now be up and running
Installing Remote Build Agents
You might want to run the builds on additional Jenkins agents, especially if a large amount of students should use the system at the same time. Jenkins supports remote build agents: The actual compilation of the students submissions happens on these other machines but the whole process is transparent to Artemis.
This guide explains setting up a remote agent on an Ubuntu virtual machine that supports docker builds.
Prerequisites:
-
Install Docker on the remote machine: https://docs.docker.com/engine/install/ubuntu/
-
Add a new user to the remote machine that Jenkins will use:
sudo adduser --disabled-password --gecos "" jenkins -
Add the jenkins user to the docker group (This allows the jenkins user to interact with docker):
sudo usermod -a -G docker jenkins -
Generate a new SSH key locally (e.g. using
ssh-keygen) and add the public key to the.ssh/authorized_keysfile of the jenkins user on the agent VM. -
Validate that you can connect to the build agent machine using SSH and the generated private key and validate that you can use docker (
docker psshould not show an error) -
Log in with your normal account on the build agent machine and install Java:
sudo apt install default-jre -
Add a new secret in Jenkins, enter private key you just generated and add the passphrase, if set:
-
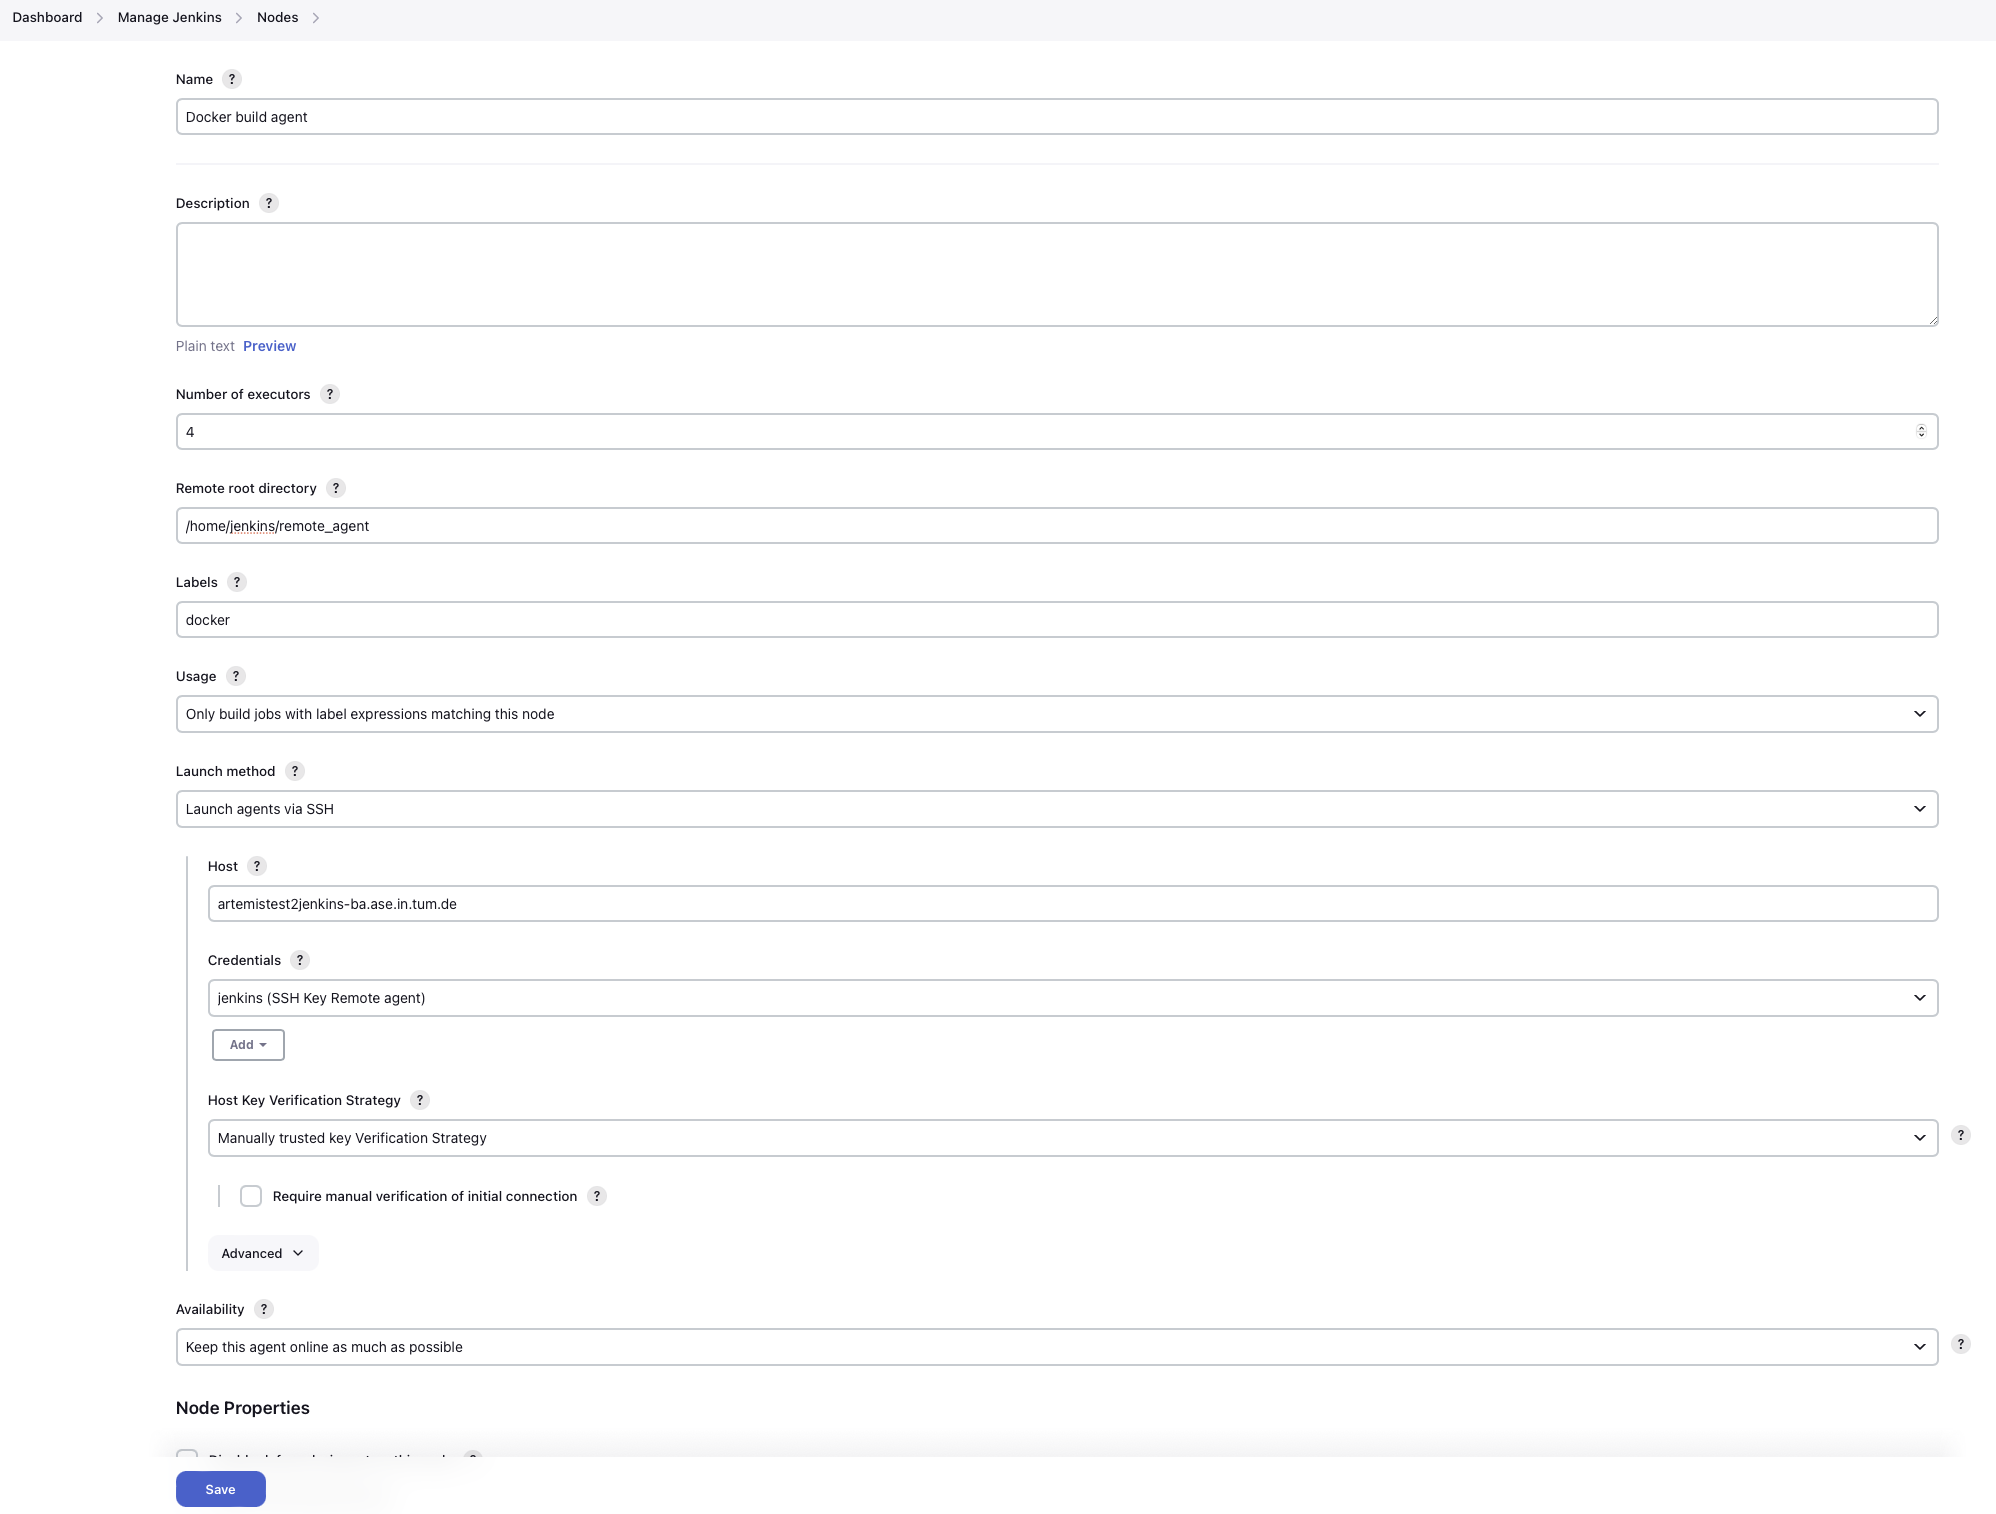
Add a new node (select a name and select
Permanent Agent): Set the number of executors so that it matches your machine's specs: This is the number of concurrent builds this agent can handle. It is recommended to match the number of cores of the machine, but you might want to adjust this later if needed.Set the remote root directory to
/home/jenkins/remote_agent.Set the usage to
Only build jobs with label expressions matching this node. This ensures that only docker-jobs will be built on this agent, and not other jobs.Add a label
dockerto the agent.Set the launch method to
Launch via SSHand add the host of the machine. Select the credentials you just created and selectManually trusted key Verification Strategyas Host key verification Strategy. Save it.
-
Wait for some moments while jenkins installs its remote agent on the agent's machine. You can track the progress using the
Logpage when selecting the agent. System information should also be available. -
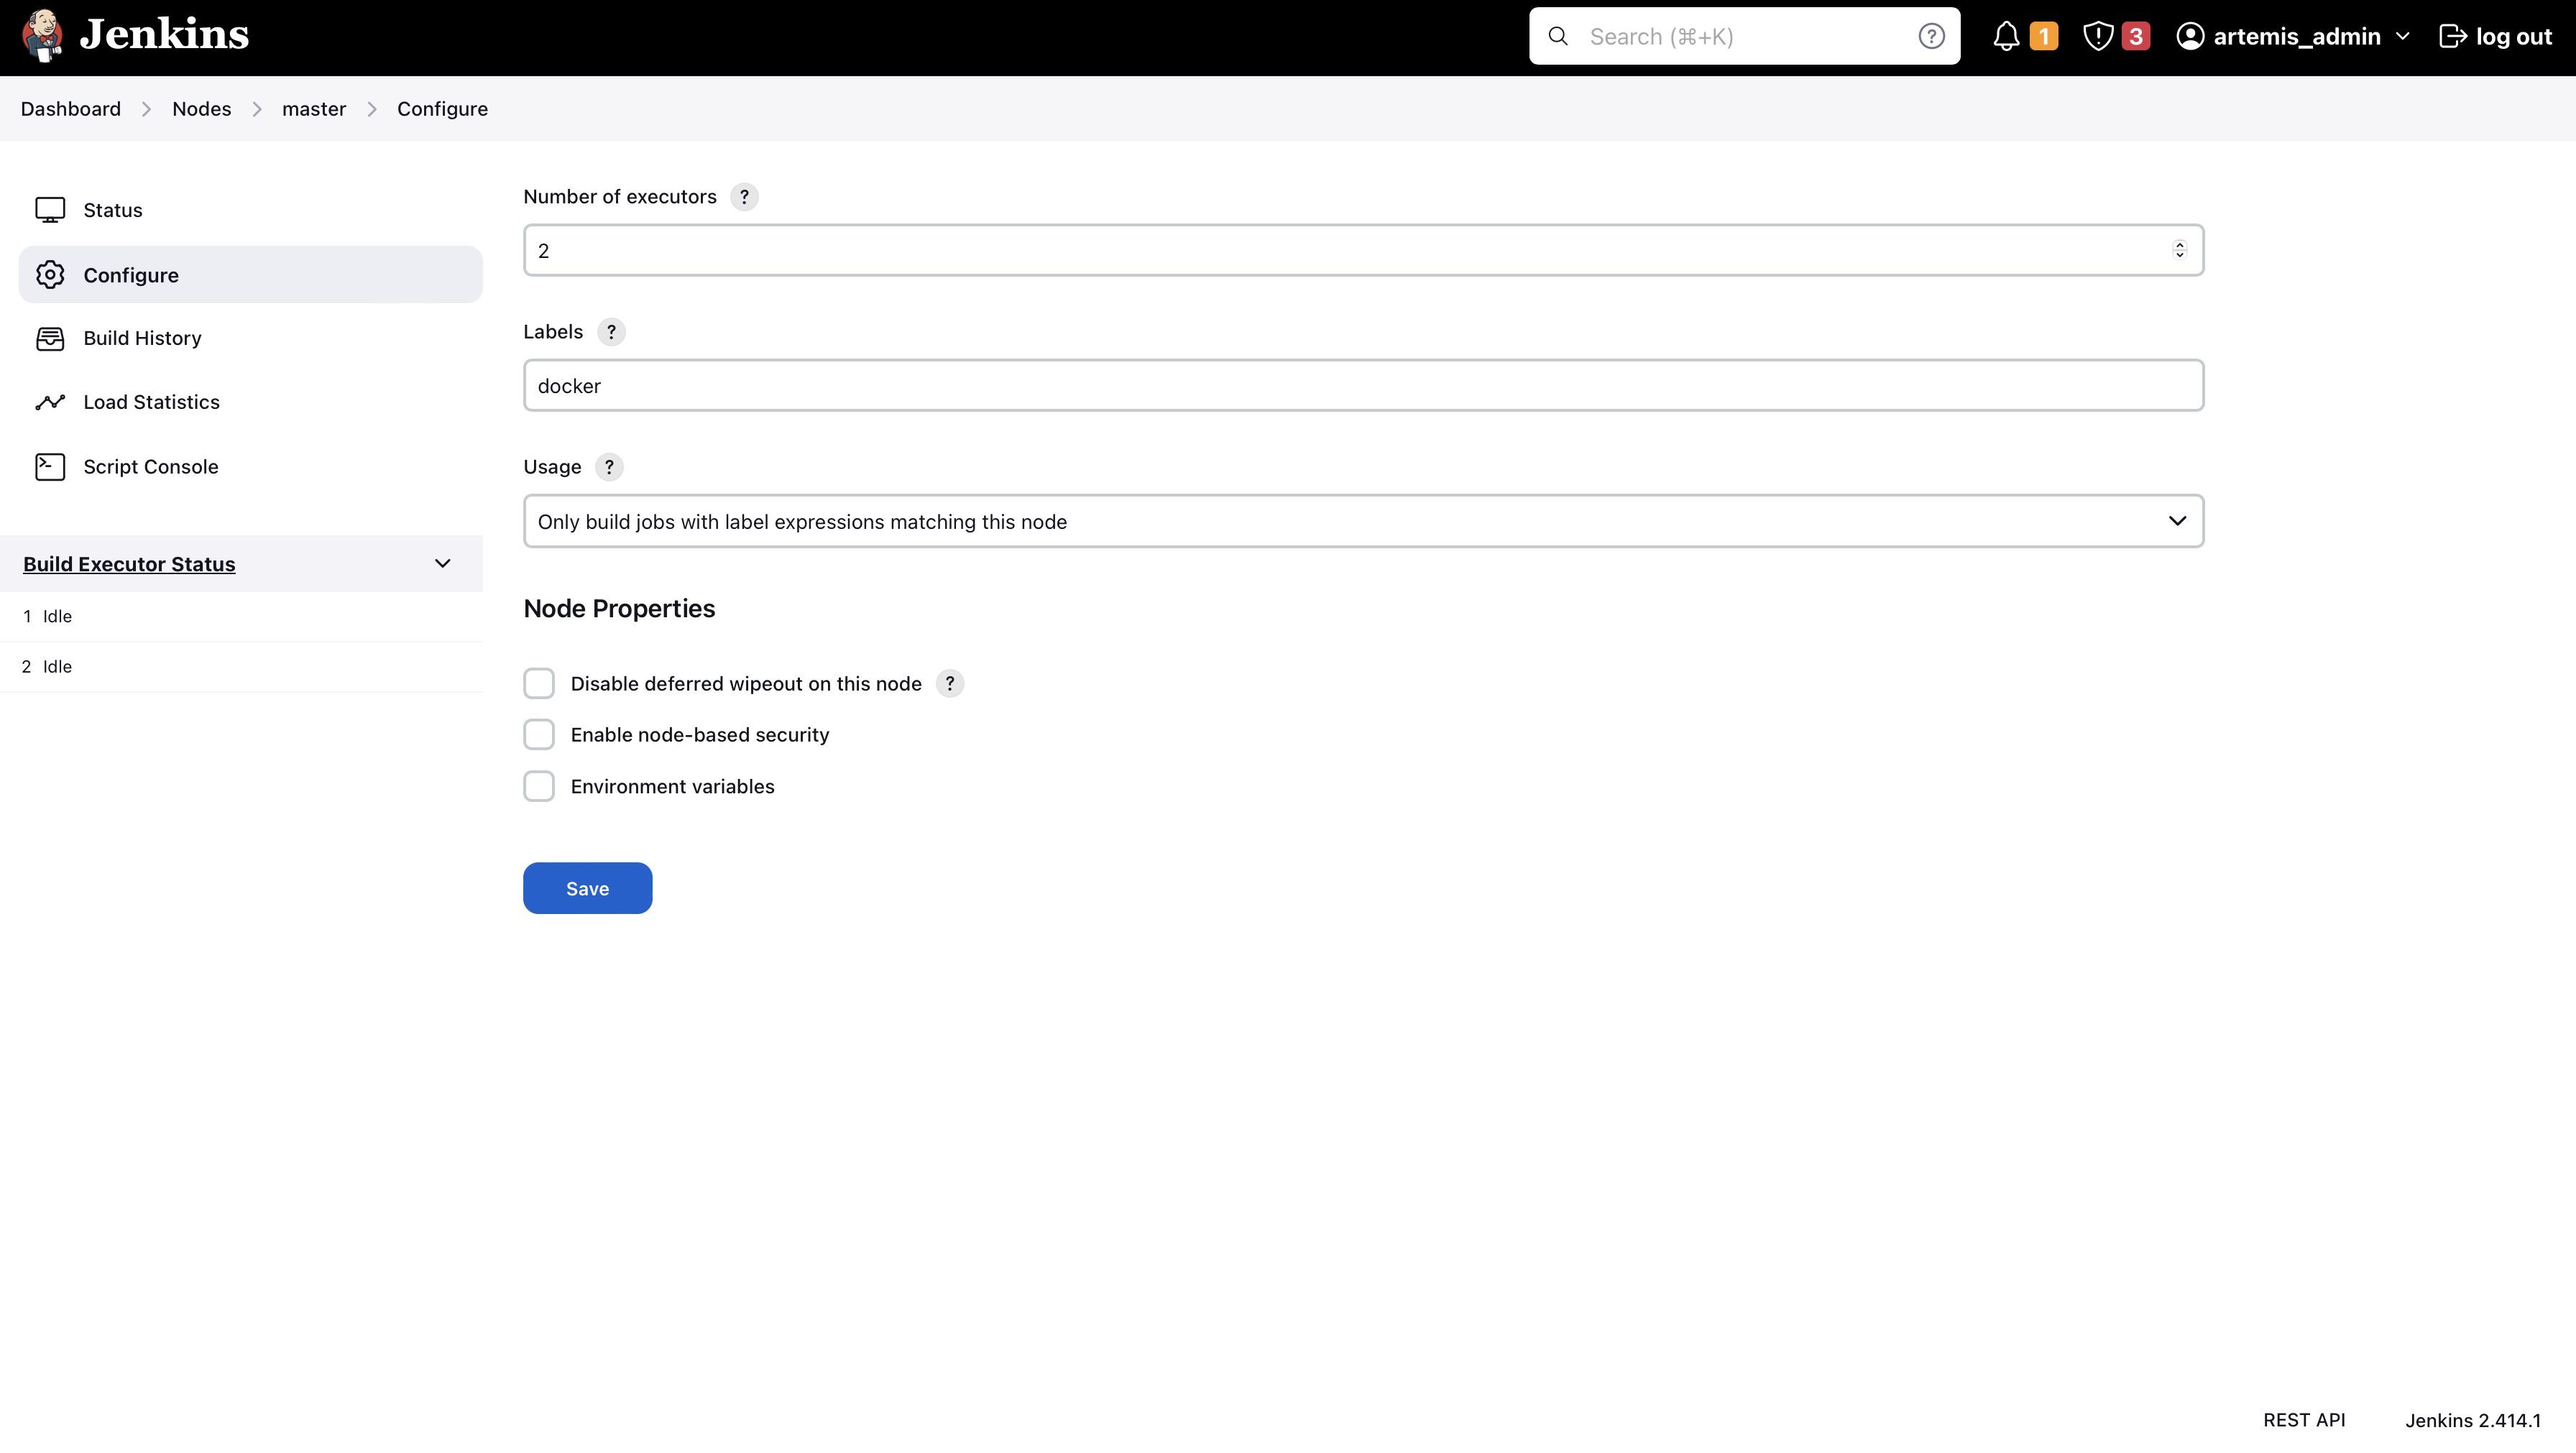
Change the settings of the master node to be used only for specific jobs. This ensures that the docker tasks are not executed on the master agent but on the remote agent.
- You are finished, the new agent should now also process builds.
Jenkins User Management
Artemis supports user management in Jenkins as of version 4.11.0. Creating an account in Artemis will also create an account on Jenkins using the same password. This enables users to login and access Jenkins. Updating and/or deleting users from Artemis will also lead to updating and/or deleting from Jenkins.
Unfortunately, Jenkins does not provide a Rest API for user management which present the following caveats:
- The username of a user is treated as a unique identifier in Jenkins.
- It's not possible to update an existing user with a single request. We update by deleting the user from Jenkins and recreating it with the updated data.
- In Jenkins, users are created in an on-demand basis. For example, when a build is performed, its change log is computed and as a result commits from users who Jenkins has never seen may be discovered and created.
- Since Jenkins users may be re-created automatically, issues may occur such as 1) creating a user, deleting it, and then re-creating it and 2) changing the username of the user and reverting back to the previous one.
- Updating a user will re-create it in Jenkins and therefore remove any additionally saved Jenkins-specific user data such as API access tokens.
Jenkins Build Plan Access Control Configuration
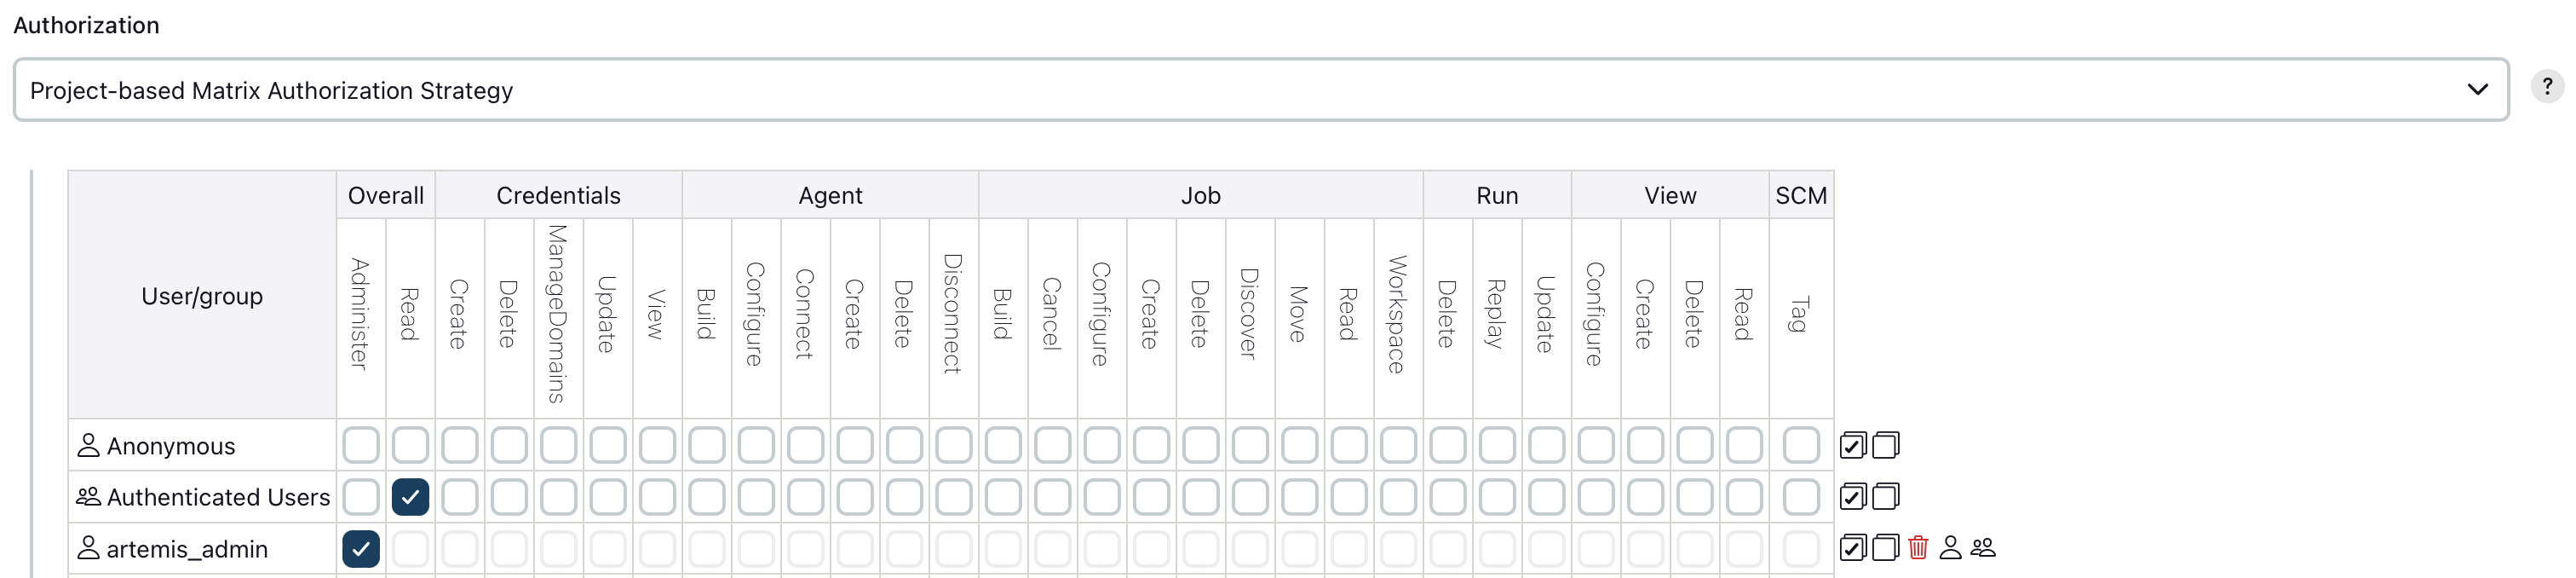
Artemis takes advantage of the Project-based Matrix Authorization Strategy plugin to support build plan access control in Jenkins. This enables specific Artemis users to access build plans and execute actions such as triggering a build.
This section explains the changes required in Jenkins in order to set up build plan access control:
-
Navigate to Manage Jenkins → Plugins → Installed plugins and make sure that you have the Matrix Authorization Strategy plugin installed
-
Navigate to Manage Jenkins → Security and navigate to the "Authorization" section
-
Select the "Project-based Matrix Authorization Strategy" option
-
In the table make sure that the "Read" permission under the "Overall" section is assigned to the "Authenticated Users" user group.
-
In the table make sure that all "Administer" permission is assigned to all administrators.
-
You are finished. If you want to fine-tune permissions assigned to teaching assistants and/or instructors, you can change them within the
JenkinsJobPermission.javafile.
Caching
You can configure caching for e.g. Maven repositories.
See Caching Maven Dependencies with Sonatype Nexus for more details.